👻 Psst Use code SPOOKY2026 at checkout for 30% off on the Lambda Store up until
A Zombie Survival map is a normal Source map, built in Hammer, with a handful of extra entities that tell the gamemode where survivors start, where zombies come from, and what players can buy. If you have made a Counter-Strike or Garry's Mod map before, you already know most of what you need.
To build one you need:
lambda_zombie_survival.fgd, installed exclusively through the Content Authoring Tools. Once installed, every entity in this guide appears in the entity list.lz_. The gamemode only picks up maps with this prefix, for example lz_office.This guide covers how a map plays, every entity you can place, how to make the opening titles and game over sequence look good, and the checks to run before you release.
Four survivors start in one part of your map and fight through 30 waves, buying their way into the rest of it as they go. Your job is to give them a starting area, more areas to unlock, places to restock, and somewhere for the zombies to come from.
A run goes like this:
Areas are the heart of a map. Your starting area is always open. Every other area sits behind a barrier that the team buys open with shared money. Supplies and zombie spawns belong to an area, and only appear once it is open.
The map resets every wave. Between waves the gamemode cleans up the map, which puts doors, breakables and your map logic back as they started. Opened areas stay open: their barriers fire OnAreaOpened again after the cleanup, so anything wired to that output opens again too.
The bare minimum is a navigation mesh and one regular info_zs_zombie_spawn. Without either, the first wave never starts and the server says why. Everything else makes the map better, and the rest of this guide covers it.
A typical workflow:
When you release, ship the .nav file with the .bsp, along with your radar overview. Rebuild the navigation mesh whenever you recompile the map, or it will no longer match the level.
An area is just a name. The zs_area_barrier that seals it off uses the name as its Name (targetname), and everything inside the area uses the same name in its Associated Area key. Anything with a blank Associated Area belongs to the starting area, which is always open.
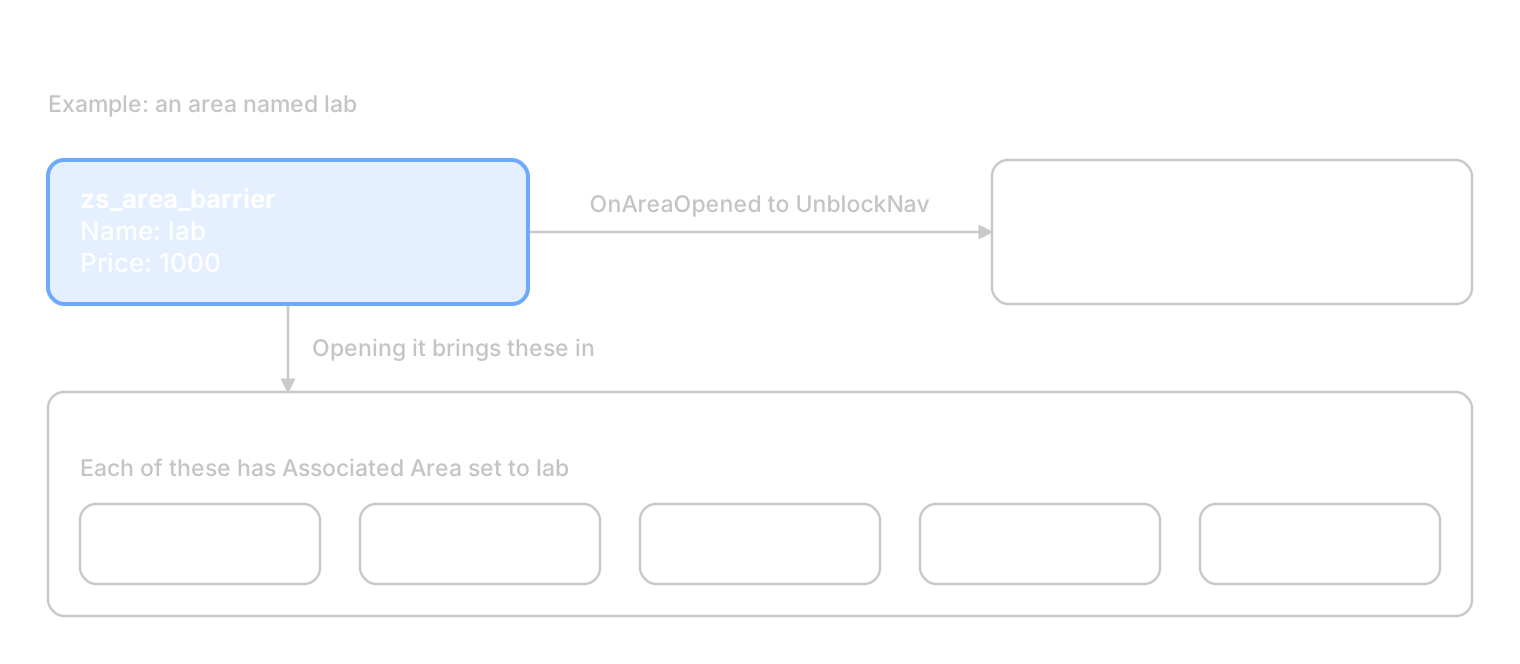
The barrier's name is the area's name: everything inside points at it, and its OnAreaOpened output clears the nav blocker in its doorway.
Survivors press Use on a barrier to buy it with the team's money. It rises out of the way and is removed, and the area's supplies appear straight away.
| Key | Default | What it does |
|---|---|---|
| Name | The area's name. Required: a barrier without a name can't be bought. | |
| Price | 500 | Team money needed to open it. |
| Open Height | 128 | How far it rises as it opens, in units, before it is removed. |
| Open Duration | 1.5 | Seconds it takes to rise. 0 removes it at once. |
Open input: opens the area without charging the team, for scripted events or a free first door.OnAreaOpened output: fires when the area opens, and again after every wave's cleanup.One area, several barriers. Barriers that share a name open together for one payment. Use this for an area with more than one entrance, or to cover a doorway wider than one barrier. Give them all the same price, because the team pays whatever the barrier they used asks.
Block the navigation mesh at every barrier. Zombies, survivor bots and delivery drones find their way along the navigation mesh, so it must not lead through a locked doorway. Put a func_nav_blocker across each barrier's doorway, set to block when the map starts, and wire the barrier's OnAreaOpened to the blocker's UnblockNav input. The cleanup between waves brings the blocker back, and the barrier's OnAreaOpened clears it again. Skip this and nothing can find its way into an area from the wave after it was bought.
Place info_zs_human_spawns in your starting area. Survivors start a run here, and anyone who fell comes back here at the start of the next wave.
The Character key picks who uses the spawn: 1 for Sir Bloody Darryl, 2 for 'The Doctor' Romanov, 3 for Special Agent Ava and 4 for the B Squadron Officer. 0 (listed as Random in Hammer) is a shared spawn any survivor can use. Each survivor tries their own spawns first, then the shared ones, skipping any that are blocked. A map with none falls back to info_player_start.
One spawn per survivor plus a few shared ones is plenty.
Place info_zs_zombie_spawns through every area, out of the way of where players stand.
| Key | What it does |
|---|---|
| Spawn Type | Regular spawns are for normal zombies. Boss spawns are only used for bosses. |
| Associated Area | The spawn is only used once this area is open. Blank means the starting area. |
| Zombie Class | Forces every zombie from this regular spawn to be one type: Shambler, Runner, Soldier, Bloater, Crawler or Headcrab. Leave it blank to use the wave's own mix. |
The gamemode picks spawns for you each time a zombie appears:
A spawn counts as hidden when no survivor can see a point 48 units above it. A zombie that gets stuck is also moved to a hidden spawn near the survivors, so spawns in every area keep the action close.
Bosses use boss spawns in open areas when there are any, and regular spawns otherwise. Bosses are big, so put boss spawns in large rooms with plenty of headroom.
Each box spawn puts its box at the spawn's position and angles once its area is open. All three have an Associated Area key, and fire OnBoxSpawn when a box appears there.
| Entity | What appears | Notes |
|---|---|---|
info_zs_ammo_box_spawn |
An ammo box | Every spawn in an open area gets one. Survivors pay to top up their spare ammo. |
info_zs_weapon_box_spawn |
A weapon box offering one gun | Weapon Type picks the category: Pistol, SMG, Mid-Tier (which includes SMGs), Rifle (which includes snipers), Grenades, Healthshot or All. The offer changes every wave. |
info_zs_mystery_box_spawn |
The Mystery Box | Only one is on the map at a time, at a random open spawn each wave. When it rolls the bear, it moves to a different open spawn. |
The Mystery Box needs at least two open spawns before it can roll the bear and move, so give the starting area two, and add more in later areas.
Delivery drones fly crates to survivors who order from their tablet. An info_zs_drone_spawn is where they enter and leave the map: a vent, a window, a roof hatch. The drone launches from the spawn, follows the buyer, drops the crate, flies back the way it came and is removed at the spawn.
Enable and Disable: switch a spawn on and off. A disabled spawn launches nothing, but drones already out still return to it. A named spawn keeps whatever its inputs last set for the rest of the run, even through each wave's cleanup.OnDroneLaunch and OnDroneReturned: fire as a drone leaves and when it flies back in, with the drone as the activator. Use them to open a hatch and close it again.These entities don't change how the map plays, but they decide how it looks in the opening titles, the game over sequence and the tablet.
Place one info_zs_map_details. Its keys fill the map card in the opening titles, and any you leave blank are hidden.
| Key | Example | Shown as |
|---|---|---|
| Display Name | Office | The map's name. Blank uses the map's normal display name. |
| Location | London, England | A line under the name. |
| Country | gb | A flag. Use the two-letter country code. |
| Authors | Your name | The credits. |
Place one info_zs_story to tell your map's own story on the black screen at the start, in place of the default one. It has up to three parts, each with a Title (a short tag such as "The Job") and a Text.
*Phoenix Connexion*.After the story, the view flies through your map along a chain of info_zs_intro_cameras, timed to the intro music. The fly-through gets about 27 seconds.
OnCameraActive fires as the view reaches each camera.A map without intro cameras goes straight from the story to the logo, so the titles end early.
The game over sequence films about 36 seconds of your map behind the survivors' stats. Place info_zs_outro_cameras and it cuts between still shots from them in a random order, about every 6 seconds, dipping to black between shots.
OnCameraActive fires as each shot comes up.Without any outro cameras, the intro fly-through plays again instead.
The tablet's Transmissions app is an inbox of story messages, decrypted as the squad clears waves. Each info_zs_transmission adds one of your own, listed by wave among the built-in ones. Players keep what they decrypt for good.
| Key | What it does |
|---|---|
| Unlock Wave | Decrypted when the squad clears this wave on your map. |
| Sender | Who it is from, for example LAMBDA SECURITY DIRECTIVE // COMMAND. |
| Subject | Its subject line in the inbox. |
| Message | Its text. Write \n to start a new paragraph. |
A map can have up to 31, and one without a message is ignored. Finish them before you release. Players' progress is saved by the transmissions' order (wave, then subject), so adding, removing or reordering them later can change which ones players have decrypted.
Zombies, survivor bots and delivery drones all find their way using the navigation mesh, so it is worth getting right.
info_player_start in the starting area. Generation starts from player spawns, and survivors use it if your map has no survivor spawns.sv_cheats 1 and run nav_generate. It saves maps/{map}.nav when it finishes.nav_mark_walkable, then nav_generate again.nav_edit 1.You can also generate the mesh out of game with the Nav Mesh Generator in the Content Authoring Tools. Still load the map to view the result in game and tidy it up. Any mesh generated out of game also needs nav_analyze run on it.
What each part of the mesh does:
func_nav_blocker keeps everything out until its barrier is bought (see Areas and barriers).The HUD radar and the tablet's Map app both draw the same overview as Lambda's Counter-Strike maps, materials/lambda/radar/{map}_json.vmt, including its minimap volumes and altitude layers. On top of it, the tablet marks locked areas with their prices, supply boxes, teammates and pings.
Cartographer, part of the Content Authoring Tools, generates the radar for you automatically. See Generating radars for how to set your map up for it.
Without an overview the radar falls back to its default image, and the tablet's Map app shows "NO MAP DATA".
Open input for set pieces, such as a door that opens when the power comes back on.OnDroneLaunch and closed by OnDroneReturned sells the moment.Up to 24 zombies can be alive at once, alongside four survivors, drones and sentries. Optimise visibility as you would for a Counter-Strike map, with areaportals and hint brushes, and avoid huge open sightlines across the whole level.
Run through these before you release. Survivor bots fill the empty spots, so you can test most of it on your own.
lz_, and the .nav comes from the latest compile.

 Counter-Strike: Global Offensive
 Counter-Strike 2
 Left 4 Dead 2